Thursday 28 August 2014

Play Dough

Okay, so this one was really only an experiment for me, but I'm still counting it.  

My Mom used to make edible playdough for us when we were kids (not that we ate it, it tasted pretty much like salt).  I asked her for the recipe last year, and decided to try it this morning.

Here is the recipe:

1 cup all purpose flour
1/4 cup iodized salt
1 cup water
1 Tbsp vegetable oil
food colouring is desired

Cook until it forms a ball.

These were the instructions she gave me.  Cook until it forms a ball?  Alrighty.  Here we go.

I mixed up four "batches" so that I was ready to go with the cooking portion one right after the other.  I had blue, red, yellow and green food colouring in the cupboard, so, you can probably guess which colours we ended up with... ;)


RED!  Just thought I'd point that out.  Anyways, I had four of these bowls of mess sitting on my counter when I started.


Obviously, had not reached "ball" status yet.  I have a gas stove, so I cooked mine over medium heat.  Be aware that you kind of have to pay attention to this, but you don't have to constantly stir it.  I tried adding different extracts to each batch, but they really just smell like salt, so unless you want to add a LOT of extract, I would jut skip this step.

When it finally formed a ball, I put it on the counter, scraped the pot, then started on the next.


As you can see, there was flour on the counter so that it wouldn't stick, then when it cooled enough, I just shook off as much flour as I could, then kneaded what was still stuck on, and let it finish cooling on the counter.


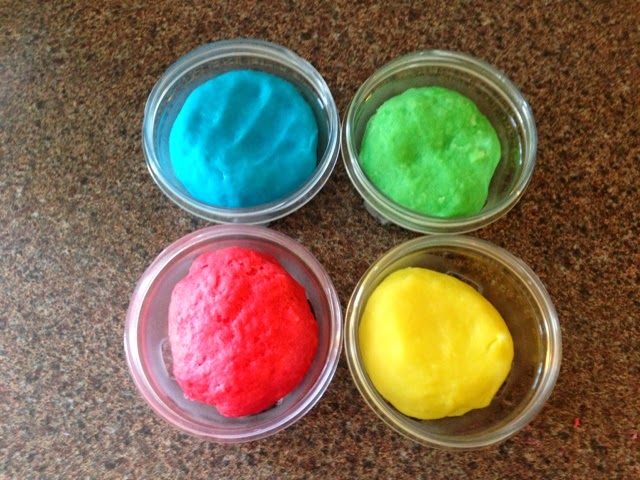
TADA!!!  I know, not that impressive.  But WAY easier than I thought it was going to be, and I like the feel of this play dough much better than the store bought kind.  This is way cheaper, and at least I know when Little Dude wants to eat his "pretend" food, it isn't going to have any long term effects.

Happy cooking!


Saturday 23 August 2014

Man Dough


This one might be a little strangely titled, but since it involves men's shaving foam, it seriously made me think of their Daddy the whole time!!!

I was surfing pinterest one day, and saw that people were mixing corn starch with shaving foam to make kind of a light and airy version of play dough.  So, outside we went.

Just a note on corn starch, it gets EVERYWHERE!!!  This stuff is so light and sticky, I am tremendously happy that we didn't attempt it inside.

Anyways, I digress.  I had measured out equal parts of corn starch and shaving foam, and let the kids have at mixing them.


I let them play with the corn starch to start off with, thinking that they might find it neat that even though it was really hot outside, the corn startch managed to feel cool the whole time.

Then we added a little food colouring to the shaving foam, and we were off to the races!


I had given them each a spatula, a plastic spoon and a bunch of different cookie cutters from their play dough bin to try out.  The mixing took way longer than I had originally planned for, mostly because it was more fun to wear it than it was to actually mix it!!


I'm not sure if I did something wrong, or if my shaving foam was thicker, but we ended up with more of a 2:1 ratio of shaving foam to corn starch, so be prepared to have extra on hand to get the right consistency of dough.


We also found an abandoned wasp nest while we were outside.  We had set up under the deck, just to not be in the direct sun for an hour, only to find something else had once liked that spot too.  Thankfully, no insects were actually inside, so after a quick discussion aout wasps, it was back to mayhem and destruction!


And voila, we have dough!!!

We are going to try the conditioner and corn starch dough next, so stay tuned and we'll let you know how it turns out!!!


Mini Fizzers

So, for our next experiment, I decided to see if I could freeze coloured vinegar.  It kinda worked.  It freezes, but just barely.  And the colour in it was REALLY vivid, even though I only added a couple drops of food colouring to each.

Then I set the frozen vinegar, a container of baking soda and a paint brush on a tray for each "kid", although it seems I could have put one out for the biggest kid...hmmmmm.


Daddy got in one this one too!


It turns out that this experiment is great for all ages!!!  

They had lots of fun making it bubble, then got distracted finding out what happened when they started mixing both colours together. 

All in all, they may have spent about 30 minutes before everything melted and fizzed itself out.  Then it was back to the trampoline.

By the way, how many of you could spent all day jumping on a trampoline and then have energy left to terrorize a sibling at the end of the day??? Seriously, 10 minutes is my max, then a good nap is needed!!!


Frozen Jello

So, since the container of "friends" was rather large, I decided I might as well freeze some more.   This time, I was a little more creative and froze them in Jello.

This was pretty easy to do, I just followed the instructions on the side of the box, except instead of chilling in the fridge, I stuck them in the freezer.  I chose lime jello as my "sea water".


Then I got even more creative and added sprinkles.  I even learned something with this one.  Both containers on the table that are green are made with lime jello, but the tree sprinkles that I added to Little Dude's jello made his go darker.  The plain old cake sprinkles that went into Sweetie's didn't alter the colour at all.  :)

For this experiment, we simply took the Jello out of the freezer, gave them each a plastic spoon and fork, and let them go at it.  The weird thing about Jello is that once it is gelatinous, it never really goes back.  And it makes for a really strange consistency once it starts to thaw, FYI.  They played with it on and off for a couple hours before it just wasn't fun anymore.  

And the call of the sprinkler was just too much to resist...

And next we....

Science Experiments!!!

It has been quite the hot summer here for us, and since science experiments are almost always messy, we have decided to take advantage of this beautiful weather and make messes outside!!!

Our first science experiment was pretty simple, just ice and salt.  I had found a huge container of plastic beads of all different sorts at walmart for $6, so I simply froze different beads in different shaped containers so the kids could "rescue" their friends.


I had some packaging tubs left over from other purchases, so I used those to freeze the beads in.  Then I gave Sweetie and Little Dude small containers of salt, and a paint brush.


Little Dude had way more fun eating his salt, but, well, what else is a 2 year old suposed to do???  Lol.


And do you know how hard it is to get both kids smiling at the camera, with eyes open, at the same time???  As you can see, I didn't manage it!!!

Anyways, it took them about 45 minutes, much more salt than I had originally given them, and lots of patience, but eventually, all new friends were rescued.  Then they found the trampoline and that was pretty much the end of it.

As a starter science experiment, this one was pretty awesome.  It even appealed to all their senses, all all parts of the experiment were child "safe".  I say this because I was there to make sure no little friends were ingested.  

Stay tuned to see what happens next...  ;)